Pallet wall planter
DIY Fun with Pallets

DIY projects with pallets are an eco-friendly and cost-effective way to bring some unique charm to your home. Here’s a step-by-step guide for a small project that you can easily make on your own.
With this simple DIY project, you can create a unique and charming addition to your home. Not only is this wall planter budget-friendly, but it’s also an environmentally conscious choice since you’re reusing a wooden pallet. Happy crafting!
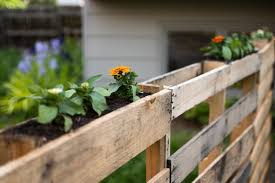
Project: Pallet Wall Planter
Materials:
- 1 wooden pallet
- Sandpaper
- Paint or stain (optional)
- Screws
- Drill
- 3 small pots
- Potting soil
- Plants
Step-by-Step Guide:
- Prepare the Pallet: Sand down any rough or sharp edges on the pallet using sandpaper. This will make the pallet safer to handle and work with. If desired, paint or stain the pallet to match your decor.
- Attach the Pots: Use screws to attach the pots to the pallet. Make sure the pots are securely attached to the pallet so they won’t fall off. You can attach the pots in a straight line, or in a more creative arrangement, depending on your personal style.
- Fill the Pots: Fill each pot with potting soil and add your chosen plants. Make sure to water the plants so they can establish roots in their new home.
- Hang the Pallet: Use screws and a drill to hang the pallet on the wall. Make sure it’s securely attached and level.
- Enjoy Your New Planter: Now that your pallet wall planter is complete, you can admire your handiwork and enjoy your new plants!